

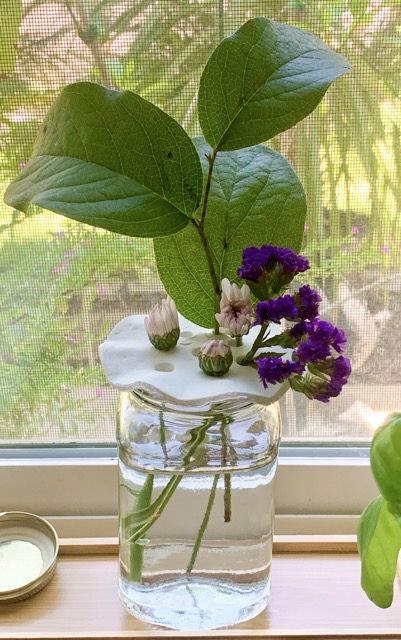
Flower Frog
By Mia Rotell
Flowers are everywhere. Whether you have bouquets all over your home, one of your little ones brought home a little yellow dandelion from school, or your garden is flourishing, spring is in full bloom. But where do you keep all the dandelions or little flowers that broke off from the bunch? Fret not! Pop a young, fragile flower into a safe and cozy flower frog — yes, that’s the actual name — and these baby blooms have a new shot outside the big vase, and you gain a rustic, primitive springtime addition to your home.
What you need:
– A knife
– A rolling pin
– Two to four disposable straws
– Parchment paper
– A jar
– A lid or circular object that is slightly bigger than the jar’s opening, aim for about half an inch
How to make it
Step 1: Lay out a sheet of parchment paper in portrait orientation, and fold it in half.
Step 2: Get a clean jar and place it off to the side.
Step 3: Find a lid or a circle-shaped item that is slightly bigger than the jar’s opening — about a quarter to half an inch is perfect.
Step 4: Take a decent-sized ball of clay and place it on the parchment paper. The size of the ball will vary depending on the jar’s size; you can always add more or take some away.
Step 5: Open the folded parchment paper and place the ball in the middle, and fold the other half over it
Step 6: Roll the rolling pin over the parchment paper until the clay is thin.
Step 7: Place the circular object that’s slightly larger than the opening of the jar in the middle of the clay and, depending on what your object is, either press it into the clay or use a knife to cut around it. Discard the excess clay.
Step 8: You will be left with a clean-cut circle.
Step 9: Take the jar and place it in the middle of the clay, then immediately lift it back up. You will be left with a light ring imprint. Go steady — you don’t want the most important part to be off-center!
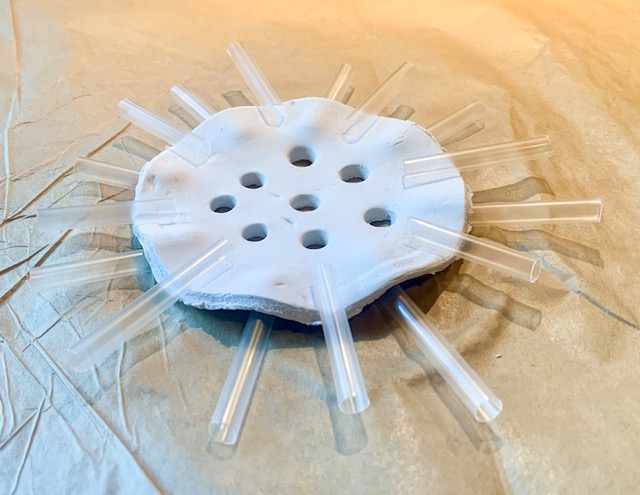
Step 10: Take a straw and push one end into the middle of the flower frog. Twist and wiggle to make a clean hole, then lift directly up.
Step 11: Repeat step 10 until you have the desired number of holes for buds — the frog pictured has eight mostly evenly spaced holes.
Step 12: After all the holes are cut out, cut about an inch off a disposable straw, gently lift the outer edge of the flower frog, and slide the straw piece underneath. This will create a bump in the clay.
Step 13: Next to the straw from the last step, place another straw piece on top of the clay — press down very, very slightly.
Step 14: Take another straw piece and place it underneath the clay next to the straw piece on top.
Step 15: Repeat this process until the entire outer edge of the flower frog has a “frilly” look. Make sure that the straws don’t extend past the circle imprint the jar made in step 9!
Step 16: Leave the straws in place. Return every hour to gently press down on the top straws — but not mandatory.
Step 17: Leave to dry overnight.
Step 18: Once dry, it’s done!
Tip: To make it water-resistant, coat it with a UV-cured gel or dishwasher-safe Mod Podge! To add a design, lightly press a rubber stamp into the clay before making holes with a straw!
Psst! Don’t forget to keep saving those empty toilet paper rolls…
For More Arts and Crafts Visit www.zapinin.com