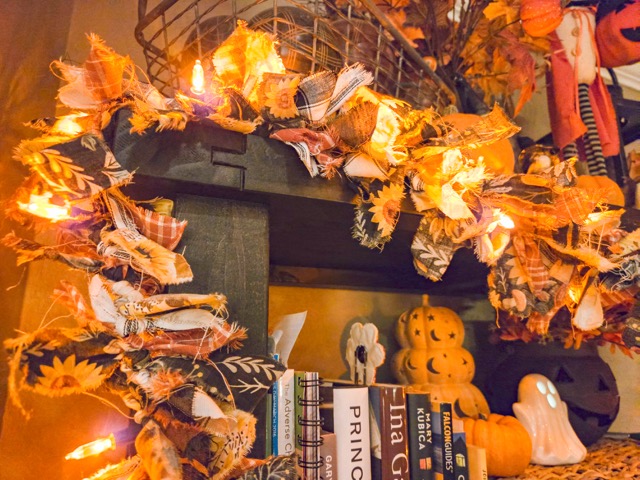

Tear Garlands Craft
BY MIA ROTELL
What makes the holidays so precious? Is it decorating the house, or spending time with loved ones? Or is it being able to stop and appreciate life a little more? The tear garland combines all the best parts of the season: fun crafts, cute decorations, and precious keepsakes that will last forever. To make a new decoration or bond with your family, it’s perfect for not only Halloween and Christmas but also great for Easter, the 4th of July, etc. It’s also great to make with kids!
What You’ll Need:
A strand of lights (any size and color)
At least 4 different patterns of fabric (must be about a yard and a half long)
Scissors
How to Make It:
Step 1: Buy a string of lights. It can be any color, variation, length, etc. A common light strand length is about 10 feet long — but make sure it fits the desired area.
Step 2: Tear your fabric into 1-by-6-inch strips. To do this, lay out the fabric and use a measuring tape along the fabric’s end to measure out the strips. Cut into the fabric 1 inch apart.
Step 3: Measure the fabric again, 6 inches into the fabric from the same side already cut — cut across the fabric. There will be a long strip of fabric that is 6 inches wide and has small cuts along the edge.
Step 4: Tear the fabric where the cuts were made. You will end up with strips.
Step 5: Repeat steps 2-4 for every fabric chosen.
Step 6: After all the strips have been torn, get the string of the lights and tie a knot to one end with one of the strips. Make sure to knot it tight.
Step 7: Knot another strip from a different type of fabric and push it all the way down to be tight next to the first knot. Make sure all the fabric is tight — the wire for the lights shouldn’t be visible.
Step 8: Repeat steps 6-7 for the entire strand, and it’s done!
Tip: Buy a longer stand of lights to fold the stand in half, or in thirds, to make the garland really light up!
For More Arts Visit www.zapinin.com