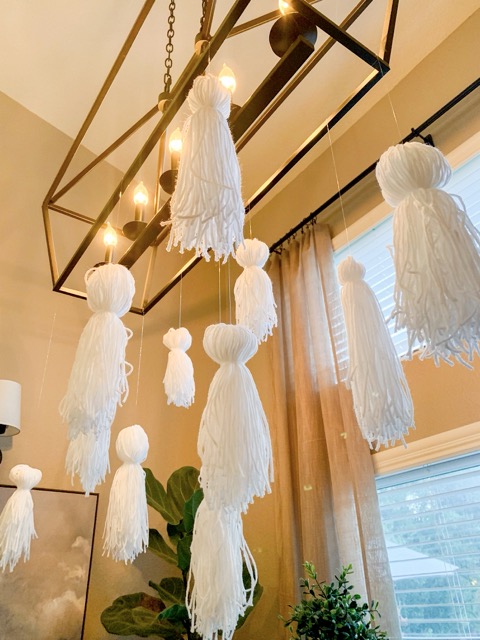


Floating Ghosts
By Mia Rotell and Lauren Rotell
Our favorite season is fast approaching — fall! That’s right, folks: Schools are back in session, pumpkin spice lattes are hitting the shelves, and leaves are trading their fresh green color for a muted hue. It’s officially time to turn the page from summer to autumn — and what better way to do that than to welcome little spooky wonderers into your home for the season?
What you need:
– A skein of white yarn
– Scissors
– A hardcover book or clipboard (the size of your ghosts will depend on the size of your book or clipboard)
– Clear fishing line
How to make it:
Step 1: Open the front cover of your book.
Step 2: Find the end of the skein of yarn.
Step 3: Lay the yarn across the open book cover, leaving the tail about 1 inch past the other end. Do not go over the pages!
Step 4: Hold the tail and securely wrap the yarn up and down the length of the book cover. Once the yarn is secured in place, you can let go of the tail.
Step 5: Repeat Step 4 at least 50 times. Wrap the yarn more times if you’re using a larger book and fewer times if you’re using a smaller book.
Step 6: Once you have enough yarn wrapped around the book, cut the yarn you’re holding where the original piece of yarn ends.
Step 7: Cut a 4-inch piece of yarn.
Step 8: Slide the small piece of yarn underneath all the wrapped yarn and move it toward the top of the book cover — the end opposite the loose tail.
Step 9: Carefully slide the wrapped yarn off the book — with the yarn resting on the 4-inch piece.
Step 10: Tie the small piece of yarn into a double knot, then cut the excess tails.
Step 11: Hold the ghost by the top and carefully slide the open scissors down the length of the yarn loops. Cut the loops as you go. Be careful!
Step 12: Repeat Step 11 until all of the yarn loops have been cut.
Step 13: Cut another 4-inch piece of yarn. Move at least 1 inch down from the top of the ghost and tie a double knot to form the head. Move the knot farther down or up depending on how large you want the head to be. Pull sections of the yarn to give the head more definition!
Step 14: Cut the excess tails from the piece of yarn used to form the head.
Step 15: Slide one end of the fishing line through the top of the ghost’s head.
Step 16: Position the ghost so there is at least 1 foot of fishing line on each side. Cut the fishing line and tie the ends into a double knot.
Step 17: Hang your ghost, and you’re done!
Tip: If you would rather turn these into a garland, don’t cut the excess tails from the piece of yarn at the top. Use different-sized books to create ghosts of different sizes, and trim the bottoms at different lengths to give the ghosts more dimension!
For More Mia Makes Visit www.zapinin.com